|
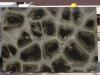
If all things antique fascinate you, then chances are that you are sure to be completely in thrall to a tumbled marble backsplash. It's hard to come to grips with the fact that an inanimate wall can bear such an uncanny resemblance to an artist's esoteric work of art.
Defined by unparalleled elegance and old world charm, its breathtaking beauty enables the property to acquire a kind of regal disdain. Above all, here's an investment whose profile weathers many a storm, and in fact displays an impressive spike in its innate appeal in the years to come.
Seven Sensible Steps
Installing a backsplash with tumbled marble does call for a sizable investment. Since the drain on your bank account is bound to be substantial, a systematic approach is advocated to prevent chaos on the brink. Here's how:
Make sure you do not gloss over the pre-sealing stage.
Installation of the backsplash with a superior quality white thinset cannot be overemphasized. The use of a pre-mixed thinset is certainly an option, but only after the natural stone has been pre sealed.
It is also advised that a small space, up to about 1/8th of an inch, be left between the tiles and the countertop. This joint must be sealed with flexible caulk, either latex or silicone. Make sure the caulk you choose is designed for the kitchen. You could also fill this area with grout.
Sanded grout is another option that can enhance the ethereal appeal of natural stone.
In case you decide to grout the entire area, make sure you complete the project in one go. The cosmetic changes can be reserved for a later stage.
The grouting process gets a shot in the arm with the use of a high-quality sealer. So once the grout cures, make sure you seal both the grout and the marble.
|