|
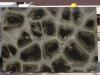
Limestone is a beautiful stone with lots of texture and color variations. The variations and appearance of this stone make it popular because it conveys a more casual feeling than the formality of some marbles. Large expanses of butt jointed limestone floors can produce a monolithic appearance that counters the more casual look of the limestone, making the finished floor look a bit grander and older than other flooring types. Butt jointed limestone is not a good choice in wet or high traffic areas because of the porous nature of the stone and the potential for movement, which will chip the edges of the stone.
1
Measure and mark the center of the longest wall in the area where you want to install limestone tiles. The sub-strate should be absolutely clean and in good condition and it should have minimal movement. This generally means that the sub-strate is at least 1-inch thick and that it has no give when you walk on it.
2
Snap a chalk line perpendicular to your mark. Measure and mark the center of the adjoining wall and snap a chalk line perpendicular to your mark. This should give you a crossing line at the center of the room.
3
Lay out 10 tiles on the floor with the sides touching each other. Note any variation in tile depth or size, which may cause installation problems.
4
Measure the length of the 10 tiles to establish a real estimate of how many tiles will fit along the length of the longest wall. You want any cut tile to be at the ends or in areas where the cut tiles are less visible.
5
Determine where your first tile should start. You want to tile from the center of the floor out and you want the tiles along to your most visible wall to be complete tiles. Lay tiles away from the visible wall, along the snapped chalk line to the approximate center of the room. Snap a new chalk line outside of the center tile to act as the tile guide line for that wall.
6
Mix thinset in a small tub and apply the mortar to the floor using a notched trowel. Place your tile along your guide line. Rock the tile after it is in contact with the thinset. Tap the tile into full contact with the thinset using a rubber hammer.
7
Tile around your initial tile butting each tile against the next. Periodically check to be certain your tiles are staying parallel with your longest and most visible wall. Each tile should be exactly the same height as the tile next to it. Use a level and work with the tile until it is smooth. If you leave tiles uneven they will destroy the appearance you are trying to achieve.
8
Cut tiles with a wet saw and tile nips. You may need to make numerous cuts around certain objects to get your tile to fit. Leave a 1/4-inch gap between the tile and the baseboard.
|