|
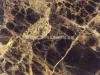
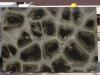
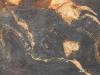
Onyx is a natural stone material that's similar to marble in its unpredictable lines and porous surface. Its luminous, grained appearance makes it one of the prettiest kinds of tiles you can lay, but also requires some extra work. Onyx doesn't present a sealed, waterproof surface like glazed ceramic, so you have to seal it yourself. Also, if you try to cut it as you would ceramic (by scoring and snapping), it's likely to go off in directions of its own. Take your time and do it right, and you'll see that it's worth the extra effort.
Proper Preparation
Onyx, like other hard tiles, needs a solid, immobile backing to prevent cracking of the tiles. Use 5/8 inch cement board for floors, and 1/4 inch cement board for walls. Affix the cement board to the wall or floor with mortar and screws. Tape the seams of the boards with mesh drywall tape and mortar, making it very smooth with your drywall knife before it dries. Use a metal putty knife to scrape the surface of the cement board to make sure it's smooth.
Laying the Tiles
As with all tiling, start the layout from the center, dividing the area into four even sections and working from the intersection. Spread thinset tile adhesive on the surface with a notched trowel. Onyx, because of its contours, should also be "buttered" on the back with a little more thinset before each tile is set, to ensure proper adhesion. Lay all the full tiles first, then go back and make the cuts for the edges. Don't try to use a score-and-snap tile cutter, as the natural fissures in the stone could go off in random directions; use a wet saw instead.
Grouting
Grouting with onyx generally works the same as with other tiles---you mix the grout, press it into lines between the tiles with a rubber grout trowel and wipe the excess off the tile surface---except you have to seal the tile first, to prevent the grout from sticking to it. That's because onyx is porous and will absorb grout and other materials if it isn't sealed. Before you grout, apply a good tile-sealer to the tile face with a brush, covering the whole surface (but not the edges inside the lines). After it dries, grout as usual. Then re-seal the whole surface, grout and tile, together.
|